一、前言
1、从Application Cache 到 ServiceWorker 再到 CacheStorage
HTML5 提供了一种 Application Cache 机制,使得基于 web 的应用程序可以离线运行。但 Application Cache 机制也存在诸多缺陷,导致它最终只能成为 HTML5 规范的 non-normative 特性。Firefox 已经将 Application Cache 列为已废弃的标准,并且计划移除相关支持的代码。ServiceWorker 最开始的一个目标是能替代 Application Cache 提供更加良好的离线体验,但很明显,随着时间发展,我们可以发现 ServiceWorker 的能力越来越强大,其能力已远远超越 Application Cache。而 ServiceWorker 里面的 CacheStorage 的能力却与 Application Cache 越来越像,它能够提供精细的存储控制能力,Fetch + Cache 已能较好的替代 Application Cache,即使在不支持 ServiceWorker 的浏览器(比如,Safari),通过支持 Fetch 和 Cache,也能较好的进行存储控制,这估计也是 Fetch 和 CacheStorage 会从 ServiceWorker 独立出来的原因之一。
2、 我们已经有非常多的存储机制,比如,AppCache, IndexedDB, WebSQL, File System API, LocalStorage, HTTP Cache 等等,为什么我们还需要新增一种 CacheStorage?已有的缓存机制,前端的控制力都偏弱,很多时候会遇到问题都束手无策。而 CacheStorage 的目标是给页端提供细粒度操作请求缓存的底层原语,等同于给页端开放操作 HTTP Cache 级别缓存的能力,它与 Fetch API 结合,让页端具备了完全操控请求,响应,缓存的能力,这正是页端一直非常缺乏的能力。
3、在PWA中,我们要实现访问一个断网的页面,显示上一次的数据的功能,就必须将上一次的数据存储到缓存中,具体的就是存储到cacheStorage中。
使用一个在service worker中使用cacheStorage的例子来讲述缓存的过程
二、初始化各文件
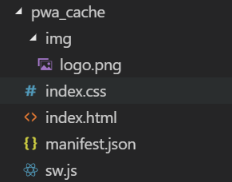
首先建立目录如下

1
2
3
4
5
6
7
8
9
10
11
12
13
14
15
16
17
18
19
20
21
22
23
24
25
26
27
28
29
30
| <!-- index.html -->
<!DOCTYPE html>
<html lang="en">
<head>
<meta charset="UTF-8">
<meta name="viewport" content="width=device-width, initial-scale=1.0">
<meta http-equiv="X-UA-Compatible" content="ie=edge">
<title>PWA-TEST</title>
<link rel="manifest" href="/manifest.json">
<link rel="stylesheet" href="/index.css">
</head>
<body>
<h1>hello pwa</h1>
<script>
window.addEventListener('load', async() => {
if ('serviceWorker' in navigator) {
try {
const registration = await navigator.serviceWorker.register('./sw.js');
console.log('注册成功', registration)
} catch (e) {
console.log('注册失败')
}
}
})
</script>
</body>
</html>
|
1
2
3
4
| /* index.css */
body {
background-color: skyblue;
}
|
1
2
3
4
5
6
7
8
9
10
11
12
13
14
| // manifest.json
{
"name": "myPWA-APP",
"short_name": "myPWA",
"start_url": "/index.html",
"icons": [{
"src": "img/logo.png",
"sizes": "144x144",
"type": "image/png"
}],
"background_color": "skyblue",
"theme_color": "green",
"display": "minimal-ui"
}
|
1
2
3
4
5
6
7
8
9
10
11
12
13
14
| // sw.js
self.addEventListener('install', event => {
console.log('install',event);
event.waitUntil(self.skipWaiting());
});
self.addEventListener('activate', event => {
console.log('activate',event)
event.waitUntil(self.clients.claim());
});
self.addEventListener('fetch', event => {
console.log('fetch',event)
});
|
三、添加缓存到cacheStorage中
基本内容如上,接下来开始写cacheStorage的内容
为了能方便操作cache,且可以判断缓存是否为旧的,我们首先用const为当前要缓存的内容起一个变量名
1
| const CACHE_NAME='cache1'
|
紧接着,在service worker中的install中添加cache,将要缓存的资源添加好
使用caches.open来得到一个cache对象
1
| const cache = caches.open(CACHE_NAME);
|
因为caches.open返回的是一个promise对象,所以这里要使用异步的方式来处理
1
2
3
4
| self.addEventListener('install', async event => {
const cache=await caches.open(CACHE_NAME);
await self.skipWaiting();
});
|
接下来,将我们要请求的内容返回的response对象添加到cache中
cacheStorage有两个添加的方法,add和addAll,看方法名也知道,一个是添加一个,一个是可以添加多个
add方法接收一个URL作为参数,返回请求到的response对象
addAll方法接收一个URL数组作为参数,返回生成的response对象
这里我们直接使用addAll方法
1
2
3
4
5
6
7
8
9
10
11
| self.addEventListener('install', async event => {
console.log('install',event);
const cache=await caches.open(CACHE_NAME);
await cache.addAll([
'/index.html',
'/img/logo.png',
'/manifest.json',
'/index.css'
]);
await self.skipWaiting();
});
|
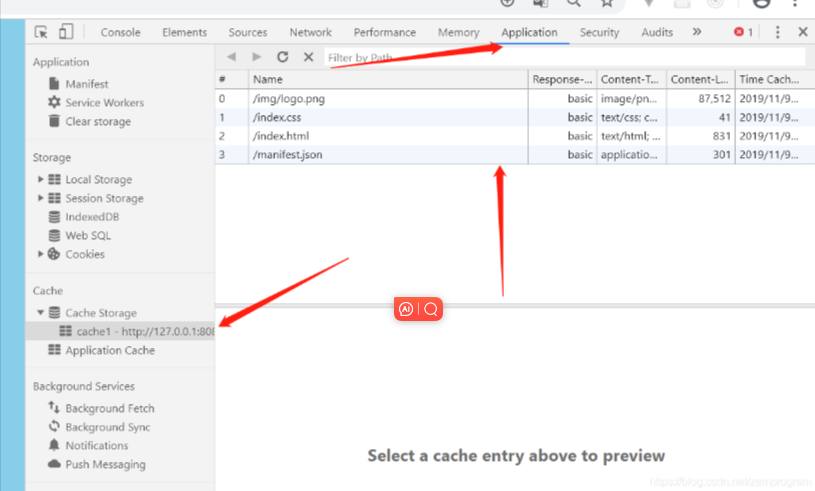
此时打开浏览器已经可以看到缓存的内容了

但是到此时,我们也只是将缓存添加了而已,并没有在断网的时候使用这些缓存,所以此时选择offline刷新是不会显示什么内容的,我们继续往下
四、删除cacheStorage中旧的缓存
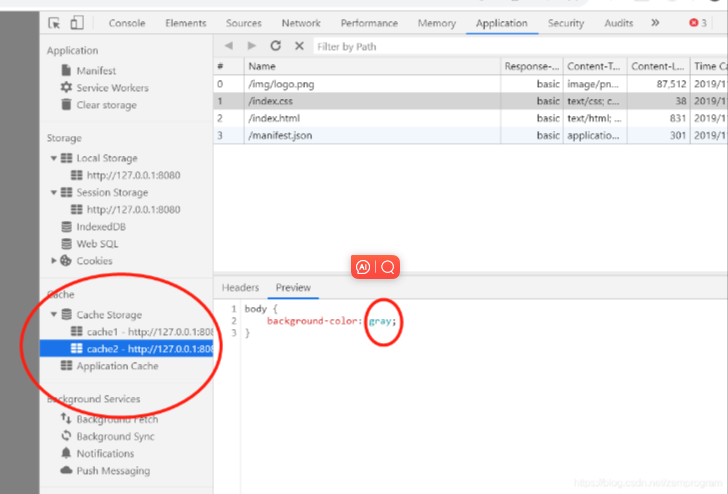
通过上面的代码,我们已经将缓存添加到cacheStorage中,如果我们修改了要缓存的内容,修改了CACHE_NAME的值,那么在cacheStorage中就会有新的缓存内容
这里修改index.css的值
1
2
3
| body {
background-color: gray;
}
|
修改CACHE_NAME的值
1
| const CACHE_NAME='cache2';
|
刷新页面发现有两个cache了

这样咋一下看上去没问题,但是仔细一想,我们的cache是用来干嘛的?是当断网的时候可以显示之前的页面上的内容的,那我们要显示的,肯定是最新的数据,既然如此,那旧的数据就没用了,所以我们应该在这里对旧的cache做一个清除操作。
1
2
3
4
5
6
7
8
9
10
11
12
13
| // 激活时删除旧的缓存
self.addEventListener('activate', async event => {
// 获取所有cache的key
const keys = await caches.keys();
keys.forEach(key=>{
// 如果cache的名字和当前名字不同
// 就将该cache删除
if(key!==CACHE_NAME){
caches.delete(key)
}
})
await self.clients.claim();
});
|
此时再次刷新,原来的cache1就不见了
五、离线时获取缓存中的数据
接下来就是最重要的一步了,说到底,我们在这里使用cacheStorage的目的就是为了在断网的时候可以查看之前的数据中最新的内容,而这部分内容就要在fetch事件中进行操作
这里先将fetch捕获到的请求的url打印出来
1
2
3
4
| self.addEventListener('fetch', event => {
// 捕获的请求
console.log(event.request.url)
});
|

可以看到,在这个页面请求的三个文件都被捕获到了,接下来我们就要对捕获到的request请求进行处理,当网络正常时,使用fetch请求相应的资源,如果网络不正常,如断网,就使用cacheStorage里面的资源。
1
2
3
4
5
6
7
8
9
10
11
12
13
14
15
16
17
18
19
20
21
22
23
24
25
26
| // 判断资源是否请求成功
// 成功->响应成功的结果
// 失败->读取缓存的内容
self.addEventListener('fetch', event => {
const req=event.request
// 给浏览器响应
event.respondWith(networkFirst(req))
});
// 网络优先
async function networkFirst(req){
try{
// 先从网络获取最新资源
// 请求可能失败,放在try中
// 有网络的情况下,请求成功,使用请求的数据
const fresh=await fetch(req)
return fresh
}catch(e){
// 没网络的情况下,请求失败,使用缓存的数据
const cache =await caches.open(CACHE_NAME)
// 在缓存中匹配req对应的结果
const cached =await cache.match(req)
return cached
}
}
|
cache.match用于匹配cache对象中与传入的request对象,如果存在匹配的,则返回cache对象中相应的response对象,否则返回undefined。在上面的代码中,匹配了请求内容与cache中的内容,当有可以匹配的内容时将该cache对应的response对象返回
此时我们清空缓存重新刷新,在network中设置为offline,再次刷新页面,发现资源还是被渲染到页面上

至此离线资源缓存完成,
六、下面是sw.js的完整代码
1
2
3
4
5
6
7
8
9
10
11
12
13
14
15
16
17
18
19
20
21
22
23
24
25
26
27
28
29
30
31
32
33
34
35
36
37
38
39
40
41
42
43
44
45
46
47
48
49
50
51
52
53
54
55
56
57
| const CACHE_NAME='cache2';
// 添加缓存数据
self.addEventListener('install', async event => {
console.log('install',event);
// 开启一个cache,得到一个cache对象
// cache对象可以存储资源。使用caches.open来得到一个cache对象,caches.open返回的是一个promise对象,所以这里要使用异步的方式来处理
const cache = await caches.open(CACHE_NAME);
// 等待添加完。通过addAll向cacheStorage中添加缓存数据
await cache.addAll([
'/index.html',
'/img/logo.png',
'/manifest.json',
'/index.css'
]);
await self.skipWaiting();
});
// 激活时删除旧的缓存
self.addEventListener('activate', async event => {
    // 获取所有cache的key
    const keys = await caches.keys();
    keys.forEach(key=>{
        // 如果cache的名字和当前名字不同
        // 就将该cache删除
        if(key!==CACHE_NAME){
            caches.delete(key)
        }
    })
    await self.clients.claim();
});
// 判断资源是否请求成功
// 成功->响应成功的结果
// 失败->读取缓存的内容
self.addEventListener('fetch', event => {
const req = event.request
// 给浏览器响应
event.respondWith(networkFirst(req))
});
// 网络优先
async function networkFirst(req){
try{
// 先从网络获取最新资源
// 请求可能失败,放在try中
// 有网络的情况下,请求成功,使用请求的数据
const fresh=await fetch(req)
return fresh
}catch(e){
// 没网络的情况下,请求失败,使用缓存的数据
const cache =await caches.open(CACHE_NAME)
// 在缓存中匹配req对应的结果
const cached =await cache.match(req)
return cached
}
}
|
七、总结
1、ServiceWorker 最开始的一个目标是能替代 Application Cache 提供更加良好的离线体验。(离线体验是本篇文章相关技术的共同目标)
优点:继承自webWorker,所以是一个独立的线程;拦截网页请求进行缓存操作。
特点:由于是拦截HTTP请求,所以必须基于HTTPS。
2、serviceWorker中CacheStorage和cachs的关系
1
2
3
4
| // cachs 是 CacheStorage 实例的只读全局变量
caches.open(cacheName).then(cache => {
// 处理打开的 cache 实例相关操作
});
|
3、serviceWorker中怎么读取缓存
(1)添加install的Listener,然后使用caches.open来得到一个cache对象,通过cache的add方法添加缓存数据
(2)添加active的Listener,当处于激活状态时,通过caches.delete来删除旧缓存
(3)添加fetch的Listener,通过try…catch来捕获在网络连接失败时通过cache.match来匹配caches缓存
(具体看第六步的sw.js完整代码)


